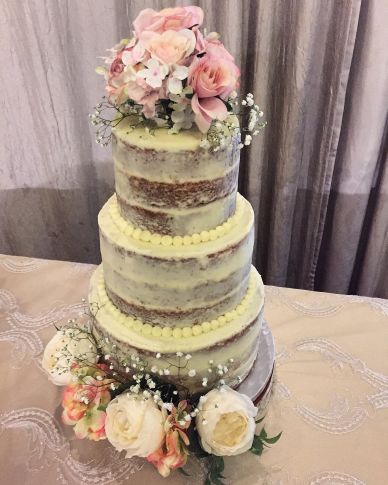
When my friend’s sister asked me to make her wedding cake at the end of last year, my first thought was ABSOLUTELY NOT. It seemed like it was too much pressure, plus I had never made a tiered cake before, and I thought this was just something best left to professionals.
Then I talked to my friend Kristine and she encouraged me to make it, saying that her sister didn’t have any Bridezilla tendencies, so I didn’t have to worry about the pressure, and that her sister has loved everything I made for her baby shower and her daughter’s first birthday over the past couple of years. I did a little bit of self-reflection, wondering why I was so quick to back away from a challenge, and after reviewing Chi’s email to me with her requests (vanilla cake, vanilla icing, ‘naked cake’ style decoration), I changed my mind. Challenge accepted!
With Chi’s wedding date of April 14th locked into my calendar and my brain, I decided that in March I would start to get serious about planning. There were five main areas that I was focused on:
- Recipe: Luckily I already have a go-to vanilla cake recipe that is super reliable and that I’ve used over the past 10 years, plus I have My Favourite Buttercream, so I didn’t have to spend any time on recipe testing.
- Scaling: In the past I’ve only made this recipe as cupcakes, or a 9″ cake, so I needed to see how to scale it both up and down, as I decided on a three tier cake that would consist of 6″, 8″, and 10″ layers. I also wanted the layers to be quite thick (I had the thin layers of this cake in mind…didn’t want that to happen again).
- Construction: I watched many hours of videos on YouTube on how to add dowels to a cake in order to stack the tiers on top of each other. I watched so many videos that the basic elements of how to do this became clear, even though everyone has their own method of doing it. I sketched out a little diagram in my baking notebook so I could visualize what I would need.
- Storage: It occurred to me at this point that I would have to remove all the shelves from my fridge to store the cake, and of course all the food that was on them.
- Delivery: How was I going to get the cake to the venue in one piece? Again, YouTube came to the rescue, and I watched a few different videos with different approaches for transporting tiered cakes. I also recruited my friend Heather at this point to help me on the day of the wedding.
Once I had done all this research, it was time to actually start executing on my plan. Here’s a timeline of my prep leading up to the wedding:
- 3 weeks before the wedding: The Bride, Groom, Maid of Honour and Kristine came over for a tasting, because I felt that’s a cute thing that brides normally get to do if they’re having a bakery make their cake. I made a 1/2 recipe of the vanilla cake in 6″ pans, which set me on the right track for my scaling. The layers were super thin, so I knew I needed a full recipe for the 6″ layer. The mini cake I made was devoured in no time, and Chi and Johnny loved it, so I felt confident in the recipe I was using. Around this time I also remembered to clean out my freezer to make room for the cake layers.
- 2 weeks before the wedding: I went to Golda’s (my favourite kitchen supply store) to stock up on the following supplies:
- Three 10″ cake pans
- 12″ cake board to build the cake on
- 6″ and 8″ cake circles to put under the top and middle tiers
- Cake leveler
- Dowels
- I also went to U-Haul to pick up a large cardboard box for transporting the cake. More on that below.
- 1 week before the wedding: This was when I started to actually bake the cakes. I did the 6″ layers one night after work, the 8″ layers on Saturday and the 10″ layers on Sunday. Once the cakes were cool, I wrapped them in two layers of plastic wrap and one layer of foil, and put them in my freezer. This was the recipe scaling that I ended up using:
- 6″ tier – 1x the recipe
- 8″ tier – 1.5x the recipe
- 10″ tier – 2x the recipe
- 2 days before the wedding: I cleaned my kitchen in preparation for “Cake Day” the next day, including clearing out my fridge and removing the shelves. I took all the cake layers out of the freezer to thaw overnight, plus took the butter out of the fridge to come to room temperature for the icing I would make the next day. Finally, I made a batch of simple syrup to brush on the cake layers to keep them hydrated.
- 1 day before the wedding (I took the day off work): I started by leveling* all the cakes to make sure they were perfectly flat and straight, and all equal height. I then mixed up my first batch of icing and started to fill and frost each of the tiers. I then measured, cut and inserted the dowels (I won’t try to explain this, it’s better to watch YouTube videos to see how to do it), and stacked the cake. I piped a border around the base of the top and middle tiers to hide the cake boards. I moved the cake to the fridge to chill overnight. At this point I also taped my cardboard box from U-Hall together, and lined the bottom of it with non-slip shelf liner paper, a tip I picked up from YouTube.
- Morning of the wedding: Woke up to an ice storm with freezing rain and ice pellets and immediately started panicking! Heather was unfazed and insisted she would be there to pick up me and the cake at the agreed upon time. I moved the cake from the fridge to the prepared box, taped it up, then went to get my building’s moving dolly to help bring the cake down to Heather’s car.
- Afternoon of the wedding: Heather arrived and we wheeled the dolly to her car. She folded down one of her backseats and I lifted the box onto it, then sat beside the cake box the whole drive to the venue, holding onto it for dear life. After a harrowing drive, we arrived at the venue, got their dolly and wheeled the cake into the reception hall. We untaped the box to find the cake hadn’t moved at all on the drive, which was just such a relief. Then after removing my coat, taking a deep breath and shouting at a group of people to stop watching me (seriously!), I lifted the cake from the box onto the cake stand. Success! I took a picture to send to the MOH, as she would be arriving later to add the flowers.
- Wedding Reception: I arrived to see the cake with it’s flowers and stared at it like a proud mama! I kept glancing at it throughout the reception, kind of amazed that it was still standing, and that nothing was sinking or leaning or melting off of it. Chi & Johnny took some cute pictures with it, and it got sliced and served later with the midnight buffet.
Overall, I’m so incredibly proud of myself that I actually did this! The question people keep asking me is would I do it again, and I honestly don’t know. I did find it pretty stressful, but now that I’ve been through it once, and I know what I’m doing, I think the next time wouldn’t be so bad. Or maybe I’ll just make myself a massive cake for my next big birthday!
*OMG this cake leveler is a DREAM come true. I have always just tried to wing it in the past when it came to leveling cakes, just using a serrated knife and eyeballing it. I knew that wouldn’t cut it this time, because the layers had to be perfectly straight so nothing was crooked. The cake leveler I bought at Golda’s is amazing, was about $12 and so easy to use.

![I made a Wedding Cake [AGAIN]!](https://planetbyn.com/wp-content/uploads/2021/10/Emmas-Wedding-Cake-150x150.jpg)


Kristine
May 9, 2018 10:41 pmThe cake was a HUGE hit, as you know! I’m so glad you took on the challenge .. I knew you would do a fantastic job!! I want a tier cake for MY birthday! Haha!