
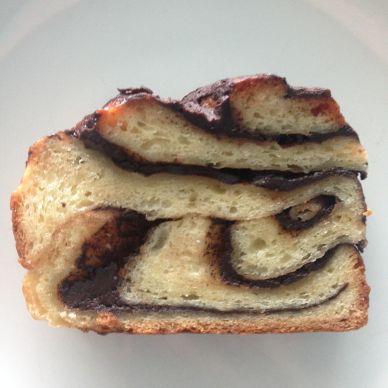
And now presenting my favourite baking project so far in 2018: Chocolate Babka! I know I’m not the only person who first learned about Babka from Seinfeld (“You can’t beat a babka!”), and was reintroduced to it when I started reading Smitten Kitchen ten years ago. It’s a yeasted bread with a rich chocolate filling that is rolled and twisted together, and baked in a loaf pan. It always seemed like such an involved project that I never wanted to tackle, but then SK posted a more streamlined recipe a few years ago, which made it seem less scary. That recipe also happened to be based off the same recipe for Chocolate Krantz Cake that I tried at that YEASTER party around the same time.
When I decided to have a YEASTER party of my own, this was at the top of my list. I kind of psyched myself out by reading all the comment’s on Smitten’s post, because people were writing about how complicated it was, how their dough didn’t rise and how their babkas never baked through. I’m here to tell you that if you follow the recipe, you’ll have no problems and be rewarded with beautiful babkas of your very own!
You also need to know that even if you don’t have a stand mixer with a dough hook (I don’t) you can still make this! It’s a bit of an arm workout, but it will turn out fine. I’ve put some notes in the directions below to show you what I did.
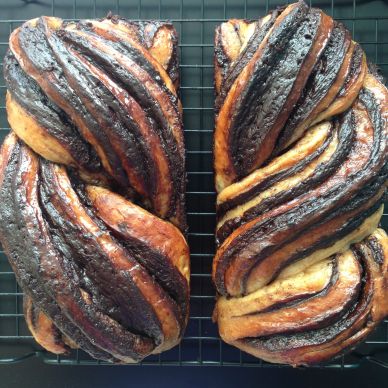
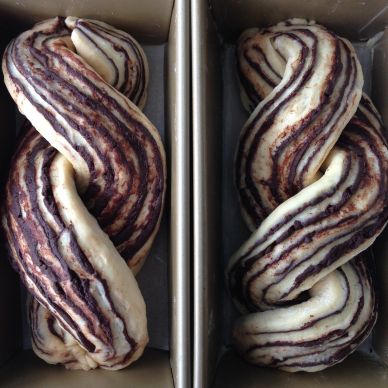
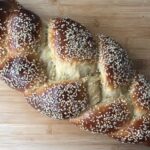
I found the process to be similar to making Cinnamon Rolls, where you roll out the dough into a big square, spread on your filling, and roll the dough into a tight log. But then instead of slicing the log into little circles, you slice it in half the long way, so it exposes long stripes of chocolate filling, and then twist the halves together.
One curious part of the recipe is that after baking, you brush the loaves with a LOT of simple syrup. I trusted Deb’s guidance and just went with it. It does NOT make the bread soggy, it just gives them a very shiny topping and a subtle sweetness.
Since this makes two loaves, you can keep one for yourself and give one away, or you can wrap one in a couple layers of plastic wrap and one layer of foil and freeze. One other note is that the dough needs to rest for 12 hours or overnight before rolling out and shaping, so it takes a bit of planning ahead. This is a labour of love, but worth every minute!
Chocolate Babka
Source: Smitten Kitchen
Ingredients
Dough
- 4 1/2 cups (530g) all purpose flour
- 1/2 cup (100g) sugar
- 2 tsp instant yeast
- 3 eggs
- 1/2 cup water
- 3/4 tsp salt
- 2/3 cup (10 tbsp) butter, room temperature (very important the butter is soft)
Filling
- 4 1/2 oz dark chocolate, chopped
- 1/2 cup (1 stick) butter
- 1/2 cup icing sugar
- 1/3 cup cocoa powder (the darker the better)
Syrup
- 1/3 cup water
- 6 tbsp sugar
Directions
- For the dough, combine the flour, sugar and yeast in a large bowl. Add eggs and water and mix with a spoon until it comes together and forms a mass (you can add up to 2 tbsp more water if it looks like it’s on the dry side [I didn’t need to]). Add the salt and stir again.
- Now this next part takes some upper body strength. Add the butter, a few tbsp at a time, working it into the dough with the spoon. This will definitely take some elbow grease and the dough will seem quite greasy, but just keep going. Once all the butter is incorporated, mix for about 5 more minutes with the spoon as best you can. Divide the dough in half and form into balls.
- Coat two separate medium sized bowls with very thin coatings of vegetable oil. Place one dough ball in each bowl and turn it to coat in oil. Cover with plastic wrap and put it in the fridge for 12 hours or overnight. It won’t rise that much, and that’s perfectly fine.
- For the filling, melt the dark chocolate and butter together, then stir in the icing sugar and cocoa powder until smooth. Set it in the fridge to cool and firm up a bit. You want it to be thick enough to spread.
- Line the bottom of two loaf pans with parchment paper and spray with non-stick spray. Remove one of the dough balls from the fridge and place on a floured surface. Roll out dough to a 10″ x 10″ square (or as close as you can get, doesn’t have to be perfect). Spread half of the chocolate filling over the dough, leaving a 1/2″ border all around the edge. Brush water along the far edge, then starting at the side closest to you, roll the dough up into a tight log, and seal the damp end. Rest seam side down on a plate/cutting board/baking sheet that can fit in your freezer, and place in the freezer while you repeat this step with the other dough ball.
- When the second log is prepared, add that to the freezer, and remove the chilled log. Trim 1/2″ from each end, then gently cut the log in half lengthwise, and place the two halves next to each other, cut sides up. Pinch the top of the halves together, then twist the halves around each other, trying to leave the cut sides facing out as best you can. Place in one of the loaf pans and set aside. Repeat with other dough.
- Cover loaf pans with a clean, damp tea towel, and let rise at room temperature for 1 1/2 hours.
- While dough is resting, make the simple syrup by stirring the water and sugar together in a liquid measuring cup that is microwave safe, and heat in the microwave for 1 -2 minutes until hot. Stir until sugar is dissolved.
- Heat oven to 375° and bake loaves for 30 minutes until golden brown. You can stick a skewer or toothpick into the middle to help you see if it’s done. As soon as you take them out of the oven, brush the tops with the simple syrup. Wait until one coat sinks in, then add another coat, repeating until the simple syrup is gone. (This seems crazy, but just trust the recipe. It does NOT make the bread soggy). Let cool for 30-45 minutes in the pans, then remove loaves to finish cooling on a backing rack. Slice and serve!


Leave a Comment