
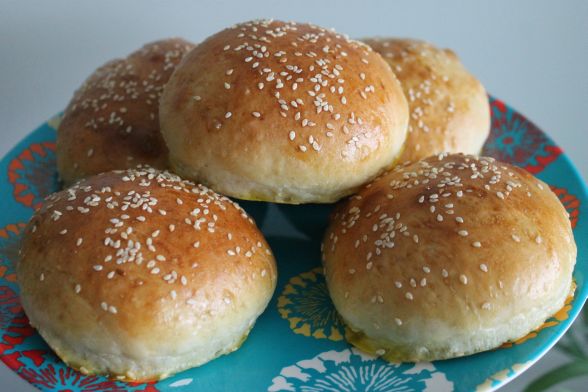
These burger buns have been my white whale. Even though I feel like I’ve conquered my fear of yeast over the past five years, for some reason, this recipe has given me nothing but frustration the handful of times I’ve tried it. But I didn’t give up!
I finally had success with it over the holidays, and it was a very humbling experience. Since you can’t go to therapy for bread baking disasters, here’s where I will work through my issues, and document my notes to myself for next time:
- The first few times I attempted these buns were on weeknights after work when I had limited time. Of course it was a disaster. I may have gotten too cocky after some of the bread baking successes I’ve had as of late. I think it’s better for me to leave the yeast projects to the weekend.
- The recipe notes that the dough is supposed to be on the sticky side, so I was always afraid of adding flour during the kneading process. This resulted in a dough that was practically impossible to shape after the first rise. Lesson learned: it’s okay to add more flour whenever it starts to get sticky during the 8-10 minute knead time. The buns will still be okay; they won’t turn out tough.
- My dough was still quite tacky during the shaping stage, but instead of giving up like the last time I tried these, I found that a light spritz of non-stick spray right on my hands really helped me to shape them and not get so frustrated.
- I really need to follow all the instructions. I thought – I’m sure I don’t need to spray the plastic wrap with non-stick spray – to place on the shaped dough balls for their second rise. Cut to me prying the off the plastic wrap and it taking half the dough with it. Womp womp. I sprayed the crap out of it this time, and all was well.
- Seriously, I need to follow the instructions. Each time I tried to make these, I skipped the baking sheet of water on the lowest rack in the oven. Each time my buns baked up flat, without the puffy shape you want in a burger bun to sink your teeth into. Of course you can see where this is going. I finally added it, and of course, my buns puffed up just like they were supposed to. Success!
As far back as this post in 2010, you can see evidence of my unhappiness with store-bought buns, and now my burger bun dreams have finally come true. These babies are soft, but sturdy, and just taste incredible. Along with barbecued burgers in the summer, here are some other things I can’t wait to stuff into these: Pulled Braised Beef & Onions, Slowcooker Buffalo Chicken, Pulled Chicken with Brown Sugar Bourbon Barbecue Sauce and of course, yesterday’s Sloppy Janes. They also freeze really well, so you can make a batch and stash the leftovers for another day.
Brioche Burger Buns
Source: Smitten Kitchen
Ingredients
3 cups bread flour (13 1/2 oz)
1 1/2 tsp salt
2 1/2 tbsp butter, softened
1 cup warm water (110-115 degrees)
3 tbsp milk
2 1/2 tbsp sugar
2 tsp active dry yeast
1 egg
+ egg wash (1 egg beaten with 1 tbsp water)
+ sesame seeds for sprinkling
Directions
- Take a deep breath, and make sure you’re not in a rush. Okay? Let’s go.
- In a large bowl, whisk together the flour and salt. Add the butter and with clean hands, rub it into the flour mixture until crumbly.
- In a glass measuring cup, add the water, then stir in the milk, sugar and yeast. Let stand for 5 minutes, or until foamy. (If your yeast doesn’t foam, it’s dead. Buy new stuff and start again).
- Beat the egg in a little bowl with a fork.
- Alright, add the yeast mixture and the beaten egg to the flour mixture, and stir together with a spatula until everything comes together.
- Turn the dough out onto a floured counter and knead it like you mean it for 8-10 minutes. The dough is quite sticky, so don’t be afraid to add more flour as you need it.
- When the dough is kneaded, shape into a ball and add to a lightly greased clean bowl (I spray it with non-stick spray), cover with plastic wrap and set aside to rise until doubled, 1 – 2 hours. (Mine only takes 1 hour).
- Line two baking sheets with parchment paper. When the dough is ready, punch it down, then cut into 8-12 equal pieces, depending on how big you want the buns.
- Roll each piece into a ball, and if the dough is too sticky, spray your hands lightly with non-stick spray, and that’ll help.
- Place the dough balls on baking sheets (6 per sheet), then cover them with plastic wrap that you sprayed with non-stick spray. Don’t skip the non-stick spray, because I have, and it’s a disaster. Let the buns rise for another hour.
- Now this is key: take another baking sheet and fill it with water. Place a rack on the lowest level in the oven, and place the water filled baking sheet on it. Now preheat the oven to 400.
- Brush the tops of the buns with egg wash and sprinkle with sesame seeds. Bake on the middle rack, one sheet at a time, for 15 minutes, until nicely golden brown.

Catherine
August 28, 2015 3:51 pmMade these tonight for BBQ pulled chicken. So good! And great instructions!
Nicole
January 20, 2015 5:35 pmBurger date ASAP!
As BBQ season approaches each year I dream of making them but I never do!
Too scared! I’ll have to give it a go.. Or invite you over