
Do you remember the book Brown Bear, Brown Bear, What Do You See? I totally remember reading this as a kid, and it still holds up today, because it’s one of my friend Francis Levi’s favourite books! Francis’ mom, my friend Nicole, asked me to make a Brown Bear cake for his 2nd birthday party and I happily accepted the challenge!
Google image search and Pinterest had lots of great inspiration, so Nicole and I went back and forth a little bit on a few images, and then decided on what she wanted. Here’s how I did it:
- I baked my go-to-vanilla cake recipe in three 9” pans, using 1.5x the recipe for nice thick layers.
- To make the head, I levelled two of the layers so they would be nice and flat.
- For the snout, I cut a 4” circle out of the centre of the third layer. I used a serrated knife to create a sort of a dome shape and soften the edges (make sure you chill the cake before you carve. I didn’t and it would have made it a lot easier!).
- For the ears, I used a 2” cookie cutter to punch out semi-circles of the remaining part of the third layer. I had to level these and stack two on top of each other to get them to the same height as the head.
- I mixed up a half batch of My Favourite Buttercream, and first set aside 1 tsp of it for later, then tinted the rest it a light brown colour. I used this to stack up the two layers for the head, and added a crumb coat to the entire thing. I also crumb coated the snout and the ears.
- Once the crumb coat had set, I added a final layer of icing to the snout and the top of the ears only (as this would be the part to show through the fur). I used icing to “glue” the snout and the ears in place.
- For the fur, I mixed up a batch of this Chocolate Buttercream and used Wilton tip #233 in a piping bag to add the fur. I started at the very bottom of the sides of the cake, and worked my way up. You’ll find that the icing gets easier to pipe as you go, since your hands warm up the icing in the bag. You have to squeeze, release and pull, so you get the little strands falling nicely against each other. Once you reach the top of the sides, take a break and stretch out your hands!
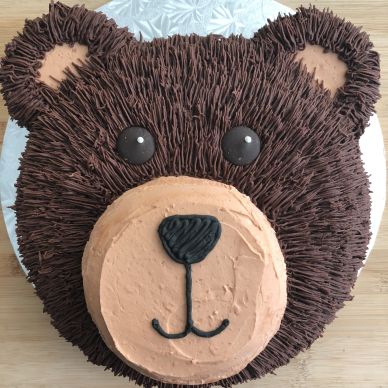
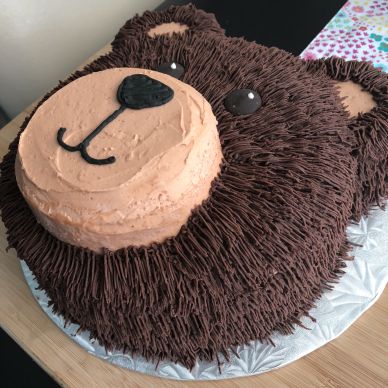
- I then repeated the same method of applying the fur to the ears, starting at the bottom and working up. When I got to the top, I carefully added the fur in a semi-circle, leaving a small part open, which you can see pictured above.
- For the face, I started at the outer edge and worked my way in, right up until the snout.
- I added two dark chocolate candy melts for the eyes, and then used that 1 tsp of plain white buttercream I saved before to add little dots with a small round piping tip.
- For the nose and smile, I added some black food colouring to about 2 tbsp of chocolate buttercream, and with a small round piping tip, traced and filled the nose and smile.
Overall, this cake was very time consuming to decorate, but I wouldn’t say it was difficult to execute. I loved the way the fur turned out and Nicole said it was a huge hit at the party!
Happy Birthday Francis!

Leave a Comment