

My track record with yeast has not been that great. I thought I had things under control when I made pizza dough back in the summer, but then the next time I made it the dough was too wet, and on the third attempt it was too dry. I hate wasting ingredients, so I was super frustrated, but I vowed to get it right. The forth time was a charm because I busted out a secret weapon: my food scale. So I weighed everything out, and I finally had a pizza dough success.

Many food bloggers preach the virtues of using a food scale to measure flour, especially when making bread or bread products. The reasoning behind this is that using the “scoop + level” measuring techinique can result in inconsistent amounts of flour. I don’t think this is really a big deal if you’re just making squares or cookies, but due to my continued failures, I thought it was time to get serious. (Note: Danielle likes to make fun of bloggers who go on and on about weighing their flour, because she says that our grandmothers were baking bread long before scales and Kitchenaid mixer dough hooks were around, and it’s not rocket science. I laughed along with her up until I started trying and failing to make things with yeast.)

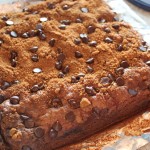
With my new confidence I tried making cinnamon buns before Christmas, but it was another epic fail all around. I was in a rush (mistake #1), my kitchen was a mess (mistake #2), I didn’t weigh my flour (mistake #3) and it was just a disaster; my dough didn’t even rise. So on one of those blissful, stress-free days between Christmas and New Years, I tackled this project. Yes, I weighed my flour. I also took the temperature of my milk mixture. I busted out all the nerdy kitchen tricks, but guess what? It WORKED. I was the proud baker of a pan of cinnamon buns that was soft, warm, buttery and dripping in cinnamony deliciousness.

I then proceeded to eat about five cinnamon buns, before flash freezing the rest and hiding them in the freezer. I feel that it’s kind of amazing that I know how to do this. I’m writing out the recipe with all my tricks below, so I don’t forget them!

Cinnamon Rolls
Source: Patent and the Pantry via Pioneer Woman, with my extra nerdy instructions, icing from Smitten Kitchen
Yield: 1 9″ pan of cinnamon buns (7 medium size ones, 6 smaller ones)
Ingredients
Rolls
1 cup milk
1/4 cup vegetable oil
1/4 cup sugar
1 1/4 tsp active dry yeast
2 cups all-purpose flour (9 oz) + 1/4 cup all-purpose flour (1 1/8 oz)
1/4 tsp (heaping) baking powder
1/4 tsp (scant) baking soda
3/4 tsp salt
1/2 cup brown sugar
1/4 cup (1/2 stick) butter, melted
+ cinnamon
Icing
2 oz cream cheese, room temperature
2 tbsp butter, room temperature
1/2 cup icing sugar
1/4 tsp vanilla extract
Directions
-
In a microwave safe glass measuring cup, stir together the milk, oil and sugar and heat in the microwave for 1 minute. Remove from the microwave and stick in a candy thermometer. It should be about 110°-115°. Sprinkle the yeast over top and let sit for 5 minutes until foamy.
-
Add the flour to a large bowl, and pour the yeast mixture over top. Stir until a dough forms and comes together in a ball. Cover with a clean tea towel or plastic wrap, and let rise for an hour, until doubled in size (I turn on my oven to it’s lowest temperature [170°], then shut it off, and put my bowl in the oven. I never know if it’s warm enough in my condo for things to rise).
-
Once dough has risen, stir in remaining 1/4 cup flour, baking powder, baking soda and salt. Stir together. I knead it a little bit in the bowl so it all comes together.
-
Clear a large space on your counter, and sprinkle with flour. Roll the dough into a large rectangle (try to avoid the shape becoming too oval; this means your rolls won’t be the same size because the ones on the end will be really small). If the dough is too springy and hard to roll out, just let it rest for 5 minutes and try again. Drizzle the butter over the dough, sprinkle with the brown sugar, and lots of cinnamon.
-
Starting with the long side, roll the dough into a tight log, and pinch the seam together to seal it. Slice the dough into even pieces, about 1 1/4″ inch wide, aiming for 9 cinnamon rolls. Reshape them a little bit with your hands into a circle (since they’ll have a flat side where you cut them). Place in a buttered 9×9″ cake pan, cover and let rise for 30 minutes.
-
Preheat the oven to 375°. Bake rolls until golden brown and your kitchen smells like Cinnabon, about 15-18 minutes.
-
For icing, mix everything together until smooth. Let rolls cool a bit, then spread over top. If you have extra icing (I did), just stick it in the freezer until you make your next batch of cinnamon rolls!
dulcetdevotion
January 15, 2012 11:47 amI must try these! Yumm!
frugalfeeding
January 14, 2012 1:36 pmThat looks so prefect and delicious in that pan – I love the way it expands to fill it out!