

Thanksgiving is my favourite holiday, but let’s be honest, this year it’s just going to be weird. Instead of dwelling on it, I decided to focus my energy on the food, and scaling down all my must-have dishes for our small celebration of three (me + my parents). So it’s the perfect time to document my favourite recipe for stuffing.
I’ve been making this recipe since 2016, but because I only make it once or twice a year, I forget the method each time. I’m finally re-writing it here, so it’s streamlined and uses less dishes (and as a bonus, I won’t have to visit The Blog That Shall Not Be Named to look it up)..
I have a few notes on this recipe and stuffing in general:
- I guess technically this is a “dressing” recipe, not a “stuffing” recipe, since it’s baked outside the turkey in a casserole dish. I don’t think anyone actually cooks stuffing inside a turkey anymore, right?
- While this is a super easy recipe to make, the most important thing to remember is to set out your bread to dry at least a day or day and a half before you make it, so it can dry out. If you try to make it with fresh bread, it’ll just turn to mush.
- I’m definitely not keeping jars of dried sage, thyme and marjoram around my kitchen, so my hot tip here is to head over to Bulk Barn because you can buy the tiny amounts of each herb that you need.
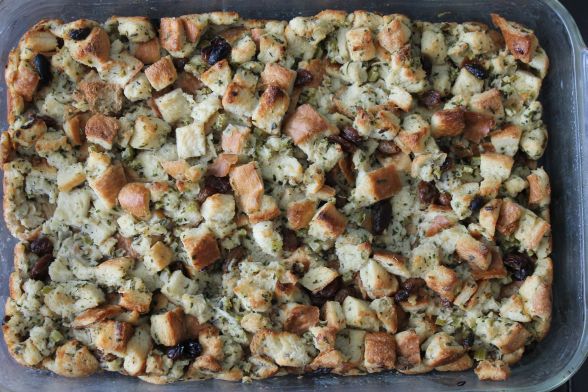
- On Alison Roman’s NYT Thanksgiving video from last year, she advocated for tearing the bread for stuffing by hand, instead of slicing it with a knife. I did that this year and liked the outcome, with some nice crispy crunchy bits, but you can just cut it too (pictured above).
- This is a very traditional bread stuffing recipe with only bread, celery, onion and herbs. When we were growing up my Mom added raisins to her stuffing, which was a tradition from my Dad’s side of the family, but I put an end to that in 2016 (you can see them in the picture above where they burned a little bit, and I haven’t included them since!)
As I mentioned, this is really easy to make. You just cook down some celery and onions in butter, mix in some dried herbs, add this mixture to chicken stock and eggs (to bind it all together) and fold in the bread cubes. That’s actually it, but every year I forget how easy it is. You can also make it a couple of days in advance which I’m all about for holiday cooking. There are instructions for that included below.
In 2018, I made this traditional stuffing plus a cornbread and bacon stuffing just to mix things up a bit, and this version was hands down the most popular. Happy to add it to my collection of favourites here!
My Favourite Stuffing
Source: The blog that shall not be named, and now I won’t have to go there to get this recipe!
Yield: a 9×13″ baking dish, this would serve 10-15 people (depending on how much they love stuffing)
Ingredients
- 6 tbsp butter (+ a bit extra for buttering the pan)
- 2 stalks of celery, finely chopped
- 1 medium onion, finely chopped
- 1/4 cup fresh parsley, chopped OR 2 tbsp dried parsley
- 1 tsp dried sage
- 1 tsp dried thyme
- 1/2 tsp dried marjoram
- 3 1/2 cups chicken stock
- 2 eggs
- 1 tsp salt
- 1 tsp freshly ground black pepper
- 1lb 5 oz plain dried bread cubes, either cut with a knife or torn by hand (this is one loaf of plain white bread I get in the bakery of the grocery store, nothing fancy)
Directions
- Get out a 9×13″ casserole dish and butter generously or spray with non-stick spray.
- In a large skillet or dutch oven, melt the butter over medium heat. Add the celery and onion and cook until softened, about 10 minutes. Stir in the parsley, sage, thyme and marjoram and cook for 1 more minute.
- In a large bowl, whisk together the chicken stock, eggs, salt and pepper. Add the celery/onion mixture and stir until combined.
- Gently fold in the bread cubes until MOISTENED (heh), and add the mixture into the prepared dish.
- MAKE AHEAD: wrap tightly with plastic wrap and stick in the fridge for up to 24 hours. When ready to bake, bring the dish to room temperature for 30 minutes, then remove the plastic wrap, cover with foil and bake at 400° for 25 minutes. Remove the foil and bake for another 25 minutes until crispy and golden brown on top.
- BAKE RIGHT AWAY: cover with foil and bake at 400° for 25 minutes. Remove the foil and bake for another 25 minutes until crispy and golden brown on top.

Stephanie
October 29, 2020 5:47 pmI have no idea how I missed your mashed potato tips the first time! Thank you so much!! (Why is it the Blog that shall not be named…did I miss that too?)
byn
October 30, 2020 9:01 amYou can read my Bakers Against Racism post to see why I don’t support that blog anymore, but that right there probably tells you all you need to know.
Stephanie
November 2, 2020 9:23 amOh my! HOW DID I MISS THAT POST. Okay, so, this brings me back to way back to when this certain blog had “Irish Car Bomb” cupcakes and refused to change the name for a very, very long time. I can understand not comprehending what that title actually means because it is a popular drink, but to be so tone deaf when it is brought to your attention? The hits and comments her blog received were insane, so I guess that’s the answer.