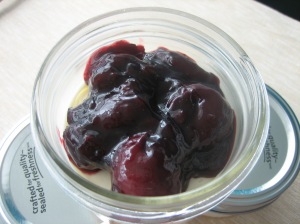
Dessert in a jar was so on trend for Summer 2011. I had been seeing cute ideas all over the blogosphere, but it was the cherry cheesecake in jar at Charcut that really put me over the edge. I found a package of 12 jars at Wal-Mart for about $10, and I was super excited to bust them out.
I decided to replicate (as best I could) my dessert from Charcut, so I started by mixing up a graham cracker crust recipe in a bowl, and adding a few spoonfuls into each jar. Next I made an easy no-bake cheesecake mixture, which is very similar to the Strawberry Cheesecake Graham Tartlets from last month. Finally, while Connie had talked to Danielle and I about her housemade cherry preserves, I saw a recipe on My Baking Addiction for homemade cherry pie filling, and figured it was a great starting point.
I made these for my little end-of-summer faux BBQ, and they were so cute and everyone loved them. They’re a great idea for a dinner party because you can make them ahead of time and stash them in the fridge until it’s time for dessert. Extra bonus points because they tasted amazing and super extra bonus points because they’re easily made gluten free by leaving out the graham cracker crust for your GF friends.
Cherry Cheesecake in a Jar
Source: Back of the graham cracker crumb box + Babble + My Baking Addiction
Ingredients
Graham Cracker Crust
1 1/4 cups graham cracker crumbs
1/4 cup (1/2 stick) butter
Cheesecake Mixture
2 packages cream cheese
1 cup icing sugar
4 tbsp cream
2 tsp vanilla bean paste or vanilla extract
Cherry Topping
3 cups pitted cherries (just take a chopstick and push it through the cherry, removing the pit – just make sure you wear an old shirt when you do this!)
1/4 cup water
1 tbsp lemon juice
1/3 cup sugar
2 tbsp cornstarch
1/8 tsp almond extract (I used vanilla because I didn’t have almond, but I bet it would be awesome)
Directions
- Put graham cracker crumbs and butter into a microwave safe bowl, and heat for 30 seconds until butter is melted. Mix together until all crumbs are moistened and then divide into 8 cute little jars. Gently press down with a spoon.
- Mix all cheesecake ingredients with a hand mixer on medium speed until everything is well blended. Divide into the jars and smooth with the back of a spoon.
- For cherry topping, put all ingredients into a medium saucepan. Bring to a boil, then lower to a simmer and cook for 10 minutes, stirring frequently. Let cool for a while, then spoon on top of cheesecake mixture in jar. Pop on the tops and chill until it’s time to eat!


Catherine
June 11, 2012 7:46 amHow well do you think these would hold up if I made them to take camping on July long weekend? They look so good but they would have to travel well and survive in a cooler for a day before eating?
Byn
June 11, 2012 7:57 amI don’t think they would make it catherine – cream cheese type fillings don’t hold up well in the heat – they start to get melty and soft.
Catherine
June 11, 2012 4:38 pmThat is what I was afraid of…
srisarts
October 27, 2011 12:54 pmThese are so cute! And it doesn’t look too difficult either 🙂 I should try it out!
Danielle
September 28, 2011 8:51 pmThey look delicious! Connie would be proud of your preserves!!
Savory Simple
September 27, 2011 9:24 pmBeautiful!